Entries in Photography, Art, & Architecture (39)

Sunday
Apr172011

Macro Photography, This Time Bigger

Herr J's post on Macro Photography with Compact Cameras inspired me to give a try with a larger camera. So, while in New York last month, I picked up a Tokina 100mm f/2.8 Macro lens.

Getting the lens turned out to be a bit of an adventure....per my usual luck, I was only in the city for one weekend. After a 45 minute walk to B&H, I discovered they were closed for Purim (and always on Saturday). OK, I thought, this is a good excuse for a first visit to Adorama. And, Purim strikes again. Luckily, Herr J in his dual roles as personal electronics guru and source of all NYC knowledge, found that J&R had the lens and was open that weekend.

Fast forward a month, after getting home and trying to get back into the routine of having a job, I finally had a chance to try it out this morning in the little shopping passage across the street. Much fun for us, and amusement for the waiters at the Italian restaurant.

The verdict: I think I'm going to love this lens. Great on macro, beautiful bokeh, great colors....Not sure how it compares to the Nikon version, but all reports are that it's pretty similar quality...at half the price.

The Asam Passage area is lined with cafes and planters full of tulips, daffodils, hydrangeas, and tons of colorful spring flowers.  

Love these unusual daffodils! 


The ferns are just now coming out to join the tulips in the sun.


Another of the striped tulips - it was such a cool surprise to see all the pollen collecting in the bottom.


This one, along the Isar river.  


Though we didn't come across many cool insects to photograph on this outing, it was fun to stop and smell the roses - or at least to look at them in detail and notice so much that we usually miss when hurrying by.

My high hopes for the lens were definitely met on the macro side of things. But what I didn't expect was that it would be such a nice lens for "normal" use. And being a prime lens, it definitely makes me work a little bit more to compose the picture.

Here on the left, two girls relaxing in the afternoon where the city is renovating a part of the Isar River. What I love about this picture, is that is does NOT look at all like Munich - with the light stone and pale blue water, I would place it more a winter day in Spain or Turkey.

And on the right, the beautiful golden late afternoon light. I love this city in the spring!


Friday
Apr012011

The Olympus "Dramatic Tone" art filter (in Stuttgart)

I've blathered on quite a bit about my new man-purse/bag, the new camera that fits in it, and filled other posts with night shots, macro shots, and pics from recent trips.

I'm starting to notice that with the Olympus E-PL2 I'm using the Dramatic Tone "art filter" a LOT.  (You've probably seen it in the posts, too.)  It just cranks out interesting results -- not realistic or Pulitzer Prize-worthy, but it adds some splash and fun to amateur photography and strengthens memories of the events that are captured.  Below are my "Top 12" favorite photos using this art filter, and some comments about using the E-PL2 and the resulting Dramatic Tone output.

The following photo was taken on a weekend trip to Stuttgart.  The specific location is called Schillerplatz, in the downtown area.  I'm actually standing next to the statue of Shiller but looking away towards a church on the edge of the square.  It's about 14:30 in the afternoon on a cloudy day.  A lot of this is luck:  the sun streaking throught those clouds at just the right time, and being able to frame the steeple's cross in the light a bit.  I do like what the filter does with brick and stone -- we'll see more of this in later photos.

The next photo is also from the weekend in Stuttgart, this time at the Porsche Museum.  I have a few shots of this Porsche 911 where I was standing closer, but after I'd walked away I looked back and saw that the floor had some interesting reflections from the flatter angle.  I am using the Panasonic 14-140mm (28-280mm equivalent) lens and zoomed out quite a bit to frame the car.  I like the intensity of the red too -- it's one of the colors that plays well with this filter, to my taste anyway.

Let's leave Stuttgart now.  Photo #3 is from our weekend in Vienna.  We were having champagne before seeing a broadway-type show and decided to pull out the camera, just for kicks.  This time, due to the low light, I had on the Panasonic 20mm f1.7 lens.  That's why there is some bokeh here.  In this setting the art filter = instant mood lighting.  This is one of the side benefits of the art filters - it's fun to just mess around a bit.

Photo #4 below is also from Vienna, this time looking out from the Schönbrunn Palace terrace onto its garden.  It was early afternoon.  The sun on the right was going into my face, so I framed it to the right and let it get blown out.  Again I got some light streaking through the clouds.  The filter took the sky farthest from the sun and gave it a little more blue, and the grass a darker green.  Works for me.  Although don't the people look like results from the diorama filter?

For the next photo I was standing in the same position, but pointed the camera straight at the building at the top of the hill and zoomed out almost to 140mm (280mm equivalent).  While none of the photos in this post are sharp, this is especially soft.  Plus, you can see I got some black-dot artifacts above and left of the building.  Not sure why this happened, and it hasn't occurred since.

Photo #6 is in a hotel bar on the same weekend in Vienna.  Again, we just pulled out the E-PL2 (with 20mm f1.7) for kicks.  Frau A put the camera on the table and got an interesting mirage-like reflection.  I like the overall golden glow that the filter came up with too.  As usual, the dynamic range is not broad enough and the lights are blown out, but small enough to not be too much of a distraction.  I'd photoshop out that guy's jacket if I could...

For picture #7 we're back to the Stuttgart weekend, this time on the observation deck of the television tower.  Somehow, again, I got the tendrils of light coming through the clouds.  The filter gave the metal fence a little to much light, but the telescope-thing on the right became a very "steely" color.  In general, I like the blues and reds resulting from the algorithm in the art filter, and the grenns are OK, but am not fully captivated by the browns.

Photo 8:  still in Stuttgart, but lookout out from the Mercedes museum onto another building in the Mercedes complex.  Interestingly, this time the glass/,etal building got the bluish treatment, and the sky became stormy.  This was taken about 18:00 in the afternoon/evening, and about 15 minutes later the sky was turning red from sunset (just in time for use to board the train - no opportunity to get a shot).

I mentioned that one of the side benefits of the art filters is just messin' around.  Now we're back in Munich.  In this case, it was maybe 21:30 and I just missed a train after work -- had to wait 15 minutes for the next one.  I'm able to carry my E-PL2 in the man-bag every day because of it's form factor, so I just stuck on the Panasonic 20mm f1.7 and clicked away.  Pic #9 was a simple as looking up the stairs to the platform, but the filter did nice things with the bricks, concrete, and handrail.  Once again, lights facing directly into the camera get blown out, but keeping them small controls the damage.

Photo #10 was also an exercise in passing the time, but waiting for the morning train.  Lots of clouds threatening to snow, but not much shape to them -- so the result is not nearly as "dramatic" as in other shots.  However, the red train and yellow sign/lights are cast pretty strongly against that background.  I should have put it in shutter priority mode and captured some motion, but wasn't fast enough.  No, it's not always overcast in Germany/Austria, although it might seem like it from the photos so far...

#11 is back at Schönbrunn palace in Vienna.  The sky gets a similar treatment by the art filter algorithm, but this time the stone gets an exaggerated yellow that I like.  I do wish the statue to the left of Frau A's head had more detail and wasn't so washed out - perhaps I could recover some highlights (if I were talented enough in post processing).  Also the sky is boring because the cloulds had no texture - this art filter likes texture.  Notice too that this is the first "dramatic tone" shot without the "border" effect thrown in.  In fact, it was used, but because of the shot I wanted to crop heavily.  Lesson learned:  use the "border" effect if you can frame the shot well, otherwise don't bother if you're going to crop.

Last photograph, #12.  Yet again, making the daily work commute more interesting.  I got one of the newer U-Bahn trains that are "open" along the entire length (cars aren't closed, but connected with the "accordion"-type thing).  It's late (23:00) so only two people boarded with me -- giving clear line of sight.  I pulled out the camera and at the second stop, jumped up and shot before we started moving again.  The image is extra soft because I was zoomed out quite a bit.  I was probably 3 cars back!

Well, that's it - just some examples and a mind-dump about the Olympus "Dramatic Tone" art filter on the E-PL2.  I find it thoroughally enjoyable and given the right subject and conditions it produces some unique and satisfying results.  When the sun (finally) comes out this Spring, maybe I'll do a similar post using "Pop Art" or "Diorama" - check out initial results with those filters here.

Saturday
Mar262011

Olympus "Art Filters" (in Vienna and Stuttgart)

One of the fun features of my new camera, the Olympus E-PL2, is its "art filters".  The Olympus art filters are basically a set of pre-packaged algorithms that apply Photoshop-like processing to a JPEG file, inside the camera.  There are six "art filters" available on my camera model:

- Pop Art
- Soft Focus
- Grainy Film
- Pin Hole
- Diorama
- Dramatic tone

Frau A and I played around with a few of them over the last couple of weekends.  First, here is a "regular" photo, taken in a bar on our first evening in Vienna. 


Now here is a photo a few seconds later using the "dramatic tone" art filter.  It appears that this filter pushes the contrast pretty high, probably the saturation also, and maybe a few other tricks too.  It's my favorite filter so far, and I'll probably do a dedicated post on it later.


You can also get neat "mirage" like effects from reflections with the dramatic tone art filter.  We just set the camera on the table (marble and polished) and pointed it at the hotel entrance.  This has a warm golden glow, and the table looks pretty cool.  In this case, I'm glad we didn't have a mini tripod with us and tried the table.  Frau A did the creative work here.


A different example:  here we're at the Schönbrunn Palace gardens in Vienna, and taking a "normal" (unprocessed JPEG) photo of an arch.  The sky is slightly blue, the arch green, background buildings brick/reddish, and Frau A in front.

This is the result with the "pop art" art filter.  It cranks up the color saturation.  You can see how yellow the small part of the building through the second arch (in the background) comes through.  That I like.  The green is more intense too, and the brick colors richer.  And look how the gloves on Frau A stand out!  It's an interesting effect, but has its downsides.  For instance, the grass on the right starts out as a dirty green and becomes reddish/rusty with this filter.  That's not to my taste.


Here is one example on the streets of Vienna where the effect was OK -- probably because it was more localized.  The "regular photo" would have been a lot more subdued, because the sky was gray.  The filter took the yellow from the rental bikes and brought the color forward (it's unrealistic, but photography is art, right?).  The red car and pale yellow taxi behind it stand out a bit more too than they would without the art filter.  Because the graytone street was not affected too much, it's not too overwhelming.  The photo itself, of course, is not going to hang in the Met, but that's part of the process of getting to know a new camera and limitations of the photographers!


The "diorama" filter makes things look like a small model of the scene.  Here is a shot from the Mercedes Benz Museum in Stuttgart, about one story above the cars in the exhibit (the effect works better the higher you are above the subject).  Some whites are a bit blown out (overexposed) and it's a bit grainy because the E-PL2 likes to crank the ISO in low light, but works for this test.

 Now here's a similar photo using the "diorama" art filter.

The cars definitely get a shiny, plasticy/metallic look to them -- not bad.  The downside is that this filter takes a tremendous amount of processing.  The camera literally locks up for maybe 20 seconds while the algorithm works on the JPEG.  Also, I've noticed that it makes a lot of the photo out-of-focus.  Look at the front tire on the red car... it goes from OK to just plain blurry.  I'm guessing this is part of the goal of this filter, rather than an error, in effect trying to create bokeh?

From greater elevation, you get something like this (shot from the television tower in Stuttgart).  Again, you see some significant blurring of subjects not in the middle of the frame, which is not evident with in processed shots.  Interesting.  I'm not sure about this art filter yet.


Perhaps I'll break down the others in another post, but I was not initially excited by the output from the other filters.

For casual photographs, the art filters are actually a lot of fun and much better than using Photoshop.  Pros will prefer to use more powerful tools that give them complete control, but for weekend getaways you can get some nice surprises and turn a dreary day into something really cool.

Monday
Mar212011

Macro Photography with compact cameras

I rambled a bit about trying to get decent night photos from a compact camera in that previous post, but now it's time for some random thoughts about "marco" photography with compact cameras.  Macro photography can be simply defined as capturing small subjects.  Technically, a macro shot is when the light image that hits the sensor is close to the same size as the actual subject (thanks, Wikipedia).  Think of a mountain landscape:  on the sensor, the "picture" will be small.  If you capture an insect at a macro level, the "picture" on the sensor will approach the size of the insect in real life.  This differentiation is important to pros because it changes the mechanics of lens/light/etc.  I don't know such details, but try to take macro shots anyway.

There are two methods of going macro:  either use a zoom lens (that can focus in a macro setting), or put the front of the lens really close to the subject.  For campact cameras, even ones with quite a bit of zoom like my now-dead Canon SX200IS, only the second is really available.  Here is one of my favorites taken in garden here in Germany.  (Don't jump!)

In this case, the front of the lens was probably 3cm from the insect itself.  Many DSLRs have a minimum distance between lens and subject, often measured in feet.  Fortunately, most compact cameras today have the minimum distance specified in centimeters, and some are effectively 0cm!  In other words, the subject can basically be touching the front of the lens, but the camera will still be able to focus and capture the shot.  For whatever reason, this insect allowed me to get the lens to about 6cm from it.  The colors turned out great, and there was not a lot of movement so I didn't get much subject blur and got some neat detail.


The challenge of getting the lens so close to a subject is not only that the subject may be disturbed and move away, but the camera itself starts to cast a shadow -- because the lens is so close to the subject, it starts blocking light from reaching the subject!  In this example below, the day was clear and the sun was bright.  However, the sun was overhead, so getting too close for a top down pic just made it dark.  Therefore, I had to change my angle to ensure enough light hit the bee.  It creates a nice effect on the flower, but I could not get nearly as close as with the prior photo.

Even with the bright sun (and therefore lots of light and a fast shutter speed) insects are difficult.  They move lots, and quickly.  In the example below, the spider let me get just a few centimetes away, but was constantly moving.  That made it difficult for the compact camera to achieve focus (it kept "hunting"), and when it did, some of the spider's legs are blurry.  Still fun to take and look at, though.


The other challenge with focusing:  when the lens is that close to the subject, even with a smaller sensor you get a shallow depth of field.  Notice here that I wanted to get the ants in focus, but my camera kept grabbing a part of the plant.  I should have used "spot" focus mode, to tell the camera specifically where I wanted it to focus on.  Too bad, the ant "checking me out" would have been great in focus!

The upside of macro photography with a compact camera (and its small sensor) is that you get some "bokeh" -- the "blurred" section in the background.  Bokeh is not something you can usually get with these cameras.  In this case, the blue makes an interesting addition to the scene.

Like night photography, these are not professional examples, but fun for me.  I really recommend you experiment with your camera.  It can be fun to see what comes out, just don't get bitten.

Saturday
Mar122011

Night Photography with compact cameras

As you might have read, I finally got a new camera.  One aspect of getting to know a new camera is learning to get good night photos from it.  Until I do, I wanted to talk about using my old compact camera to get night shots.

To make it simple, there are 2 challenges with low-light photography.  First, your camera will boost the "gain" on its sensor to try and capture every last photon that strikes its surface (camera speak: increasing the ISO).  The problem with this is that higher ISO levels increases "noise" - makes a photo look grainy becuase of a scattering of white pixels that the camera thought it captured.  Second, the camera wants more time to capture the light (camera speak:  uses a slower shutter speed).  The problem with this is that moving subjecs (or a shakey camera) will cause blur.

One solution is to get better hardware of course.  Frau A has an advantage here -- she has one of the best low-light DSLRs made, the full-frame Nikon D700.  That's why it is used by so many professionals for weddings (lots of movement in low light).  Most of us use smaller cameras that don't have this asset advantage.  However, you can get interesting results from compact cameras.

Here are some random thoughts and night photo examples from some compact cameras (my now-dead Canon SX200IS and Frau A's Panasonic LX3):

(1)  Use a tripod to reduce camera shake and  (2) go after static subjects.  The first reduces blurriness due to camera shake, the second elimiates blurriness of moving subjects.  I like to (3) set a 2 second timer to the shutter, so there is a brief pause between the moment I press the button and when the camera starts the exposure.  It's the same thing you do to take a group photo and run to get in the picture.  This makes sure you don't disturb the camera during the exposure.

You can also try (4) your camera's "Night Scene" or equivalent mode.  It helps a bit, especially if you don't have a tripod.  But often the mode will not quite be "smart" enough to get a good result, so you'll have to take more manual control.

In the first example, I simply set the camera on a wall (no tripod available), changed into "S" or Shutter Priority mode, and experimented with different shutter speeds.  I found one that game me some resolution & color without over exposing too many of the small lights in the scene.  I just wanted a good memory, not a printable work of art, so this worked fine.  It's a view of the skyline in Doha, Qatar.


You will usually get better results when (5) shooting subjects that have some modest light available.  This church in Mallorca was lit from the right, and did not have any lights facing directly into the camera.  It's a little hazy due to the noise, and the colors are not that consistent top to bottom, but it's not bad.  I did not have a tripod, but was again able to set the camera on a short wall, which really helped reduce blur.  If it's a static subject with a little light on it, you can probably get a passable photo.


The Museum of Islamic Art in Doha, Qatar was also well lit.  Of course, the bottom of the frame is almost black, and some of the lights are overexposed, but that's the cost of doing business with a camera that fits into a pocket.  Good enough for me, not for a pro though.  Fortunately, there was enough light at dusk that the shutter speed could be 3x faster than the photo of the water and skyline (above) - otherwise the people here would be much blurrier.


When you are trying to take any photo where a light source is coming straight at you, you will have issues (including in the daytime, facing the sun).  In camera speak, you will go beyond the limits of the sensor's dynamic range - the ability to capture bright and dark together in the same photo.  Like the difference betweenthe foreground and the museum in the picture above.

You could do (6) exposure bracketing (capture multiple photos: some get shadow detail, others get light area detail -- and them merge them in software like Photoshop), but most casual shooters don't do such post processing.  Another option (7) is just to accept the facts of physics and artistically work within the limitations.  The photo below was of the moon and a tree.  If I captured the detail in the moon using a shorter/faster shutter speed, the tree would be basically black.  Therefore I let the moon get "blown out" (just white smear, no detail, because the shutter was open longer) as a sacrifice but got an interesting effect in the clouds, and just enough color in the trees.  Looks more like art than reality, but OK with me.


In fact, sometimes the "artifacts" produced by small sensor compact cameras (like the color in the clouds above) can be nice.  In the photo below, I was a one of Munich's biergardens, and tried a few photos with shutter speed ranging from 1 to 5 seconds.  The camera was simply set on the table rather than holding it by hand.  This was the nicest one, especially because of the "star" effect that the lens/sensor produces with some night lighting.  In this case, the light coming directly into the lens worked OK, the moving people are not too blurry, and it leaves me with a great memory of that evening.


Subject-motion blur us usually not wanted, but there are a lot of running-water photogaphs that are nice -- having a "blurry, fluffy" effect on the water.  In the case below (again in Mallorca), the fountain is blown out, but I can live with this because is has interesting shading near the top and I get some reflections on the water.  Again, if I were to keep the water exposure withing my camera's limits, we'd see nothing but black palm trees.

None of these photos are professional quality, but they do depict an interesting scene and, more importantly, capture memories. My recommendation:  (8)  get a tiny tripod (many are just a few inches long for compact cameras, fit in pockets/bags, and cost $15) and (9) experiment.  Go into Shutter priority  or "S" mode, use the 2-second timer to ensure a stable camera, and try different shutter speeds in different situations.  See what happens and have fun.


Friday
Feb112011

Cool Timelapse Video of Antarctic Expedition

Very cool video of the 54th Russian Antarctic Expedition, shot using time lapse photography.

I want to go there so badly....it's my last continent to visit, and I'd love to see the Emperor Penguins. Need to get my dry suit certification first, though!

РАЭ-54 с борта НЭС "Академик Фёдоров" from North Pole on Vimeo.

via GeekoSystem

A short overview of the expedition can be found here (using Google translate)

Saturday
Feb052011

Choosing a Camera...does it fit in my purse?

(Note: this article is supposed to be a summary of the decision process and complexities for buying a new camera.  But then I asked Herr J to "look it over" and, well, you see what happened...  Apologies to anyone who does not have an engineering PhD or permanent pocket protector!)

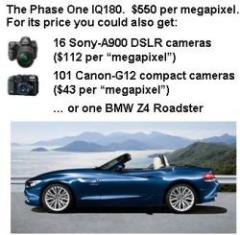
There are some pretty interesting technological developments today in digital cameras: mirrorless interchangeable-lens designs (the Panasonic / Olympus micro four-thirds standard, and APS-C models from Sony and Samsung), translucent mirrors in DSLRs, and even Phase One's over the top 30 megapixel medium format imaging sensor... now being replaced by an 80 megapixel version!  (For around $44,000 you could buy a car instead.)


 Alternative sensor techologies have been developed too, but are not making significant headway yet.  Fuji has a "reconfigurable" sensor, and Foveon a multi-layer sensor.  Ricoh went further out into left field, and has the GRX system which is a compact camera shell that uses interchangable units combining sensor and lens together! (pretty smart, out of the box thinking!)

Plus, there are increasingly good plain old point-and-shoot models.  The new Olympus XZ-1 has the "fastest" lens ever on a compact digital camera (at 28mm is f1.8!) and the Canon SX30IS has the largest focal range of any fixed lens camera ever made (35x, from 24-840mm!).  As always, there are a slew of proven APS-C and full-frame DSLRs that are the bread and butter of pros worldwide.

There are even innovations in accessories, such as a 3-D lens (for use on 3-D televisions!), wireless hot shoe attachments that send photos to any bluetooth device, and alien-looking lights for macro photography.  But in the end it all boils down to your camera/system working in your lifestyle & budget.

I'm a Nikon person... I love, love, LOVE my D700. It can't be beat for it's color rendition and low-light capabilities.  I'm not the only one -- one husband made a D700 birthday cake for his wife! And it's red velvet, too!!!

http://www.kenrockwell.com and http://www.woohome.com/food-drink/a-wifes-birthday-cake-nikon-d700/1984

I know many will call it heresy, but I also love my Panasonic LX3. Though the Nikon does fit in my larger purses even with a decently large lens, I just can't lug it around all the time. The LX3, however, is tiny (but built like a tank) and takes really great pictures, especially in low light.  (In fact, the LX3 actually changed the market in this regard.  All major players were forced to make a competing model in order to stay relevant: Canon S90/S95, Nikon P7000, Olympus XZ-1, and Panasonic's upgrade, the LX5). I also love my LX3 because of the awesome 10 Bar underwater housing that Herr J and my friends in TX gave me for my last birthday. Best Present Ever! It's a great set up for diving - I'd considered keeping my old D40 as an underwater camera, but the housings for those start around $2,000 and require different fronts for different lenses!!!  The 10 Bar and LX3 combo is so great that I've recently bought another (slightly used) LX3 to replace it when the camera wears out. I started diving with a Sony Cybershot circa 2001, and sadly the camera stopped working long before the housing. We did have a good 10 years together, but it just won't hold more than 15 or 30 minutes of charge anymore.

Herr J is in the market for a new camera, though he's been "in the market" as long as I've known him! It's a pretty big step when investing in a camera system. Whereas I'm already committed to a lifetime of Nikon (except for fixed lens compact cameras), he's still able to make a radical choice and go with newer systems and standards.  Is it better to invest in new models & lens mounts -- with the risk that they don't have longevity, or just stick with today's DSLRs?

Or perhaps one chooses a system based on available high-quality lenses and just gets a cheap body to start.  For example, I have some "good glass" that will last decades and I can reuse on any future camera bodies that have the same Nikon interchangeable lens mount, e.g., if I ever have/want to replace my D700.

What about the portability factor, like with my LX3 vs D700 -- should Herr J get a compact AND a large sensor camera, or just one mirrorless in-between size?  And what about the cost of getting an underwater housing for the camera as part of the total investment?  Housings can cost more than the cameras themselves!  (He loved our vacation photos with the LX3 + 10 Bar housing.)

We've had some good debates about the camera market, and enjoy playing around with different models in the local electronics store.  The current hot topic is "who buys into the micro four-thirds system?"  Ostensibly, micro four-thirds is "better quality than a compact, smaller than a DSLR".  It's an interesting concept and I'm curious to know if it ends up being a long-term market segment or just a brief stop on the way to something new. Obviously it appeals to early adopters who want the latest technology... and those who want better image quality than fixed lens compact cameras. But that's the irony...once you put a lens on it, it's not truly "small" anymore.

Here's the Panasonic LX3 compared to Panasonic's smallest mirrorless interchangeable lens camera, the GF1. The GF1 has a "pancake" lens attached:

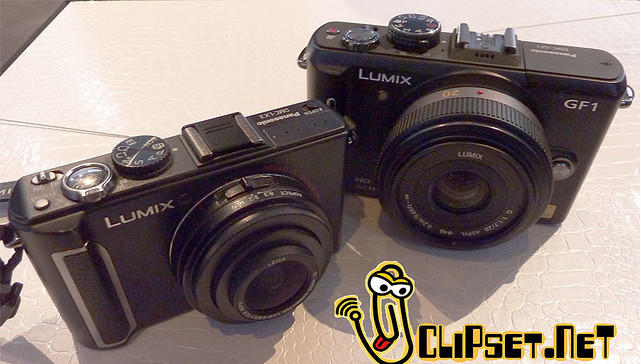
The GF1 is little taller and deeper (front to back) and might fit in large pockets -- very portable in any case.  But the LX3 has a 3x zoom capability, whereas the GF1 "pancake" has no zoom -- and most people will miss this.  Well... although the LX3 has a fixed lens, we can changes lenses on the GF1.  So, let's put a lens on the GF1 that is equivalent to the 3x zoom on the LX3.  In this case, we'll substitute Canon's G11-- a direct competitor of the LX3 and similar size (a bit bigger, actually).  Here's what we get:

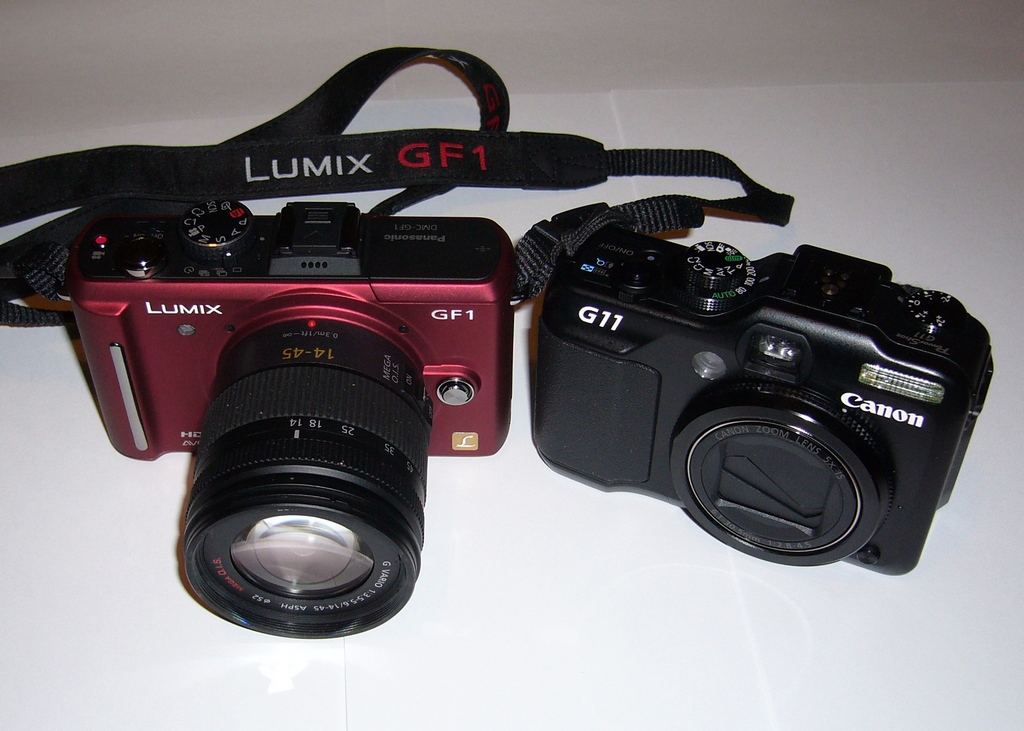
Whoa.  We just added a good 2-3 inches to the depth of the camera with that lens.  It's not fitting in anyone's pocket, but still fits in purses/bags.  That's the price you pay for getting an improvement in image quality.  The GF1's sensor is 6x larger than the sensor in the LX3 or G11 -- it needs a bigger lens to cover the sensor, but puts out better photos.  Is this worth the decrease in portability?  Hmm....

On the flip side, "m4/3" cameras are somewhat smaller & lighter than a typical DSLR because of the lack of mirror & prism, a smaller sensor & matching lenses.   Here's the Olympus m4/3 camera vs. one of the smallest DSLRs on the market (also from Olympus).   

   
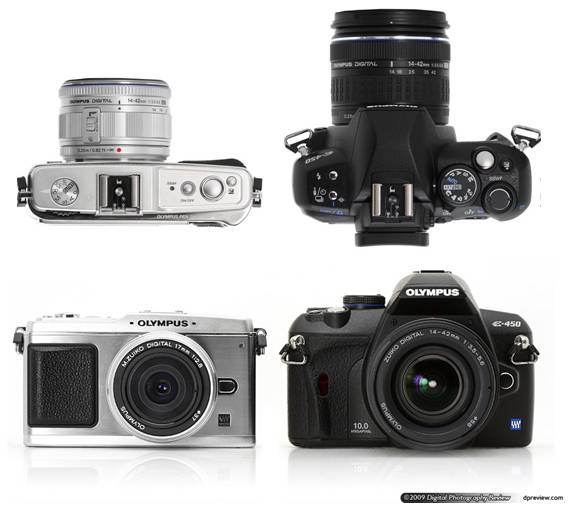
There is definitely a reduction in size -- both heigth and depth, plus weight.  However, with the current market offerings, the small DSLR costs the same or less and delivers higher performance (faster shooting, less noise at high ISO, and greater dynamic range.  Plus the DSLR has a viewfinder and much better external controls for those that manual control of the camera (rather than leaving it in Automatic mode)  We definitely lose performance with the m4/3, but did the reduction in size really give us more portability?  Remember, neither camera will fit in a pocket, so we have to transport it differently.  So where's the right place on the size/quality/price curve?

Lots to think about here.  But maybe it won't be decided on technical metrit.
I pointed out these issues to Herr J, but he laughed and then said, "But most importantly, will it fit in my man purse better?"